ScrapSensations is my Personal Blog, where I share my Personal work as well as Tutorials. Here I will also share any tutorials, layouts and Ideas I come across and feel will benefit the scrapping community and my followers. Any Creative crafts shared will be relayed back to the original artist.
Please join me and follow me on my Blog on my Scrapping and Mixed media Journey. I hope you will learn new crafts and feel inspired.
Welcome back - I hope you are all well and taking care and keeping busy.
I wanted to share this tutorial with you that I found on Crafters Companion, and
I thought this would be ideal to try at home and even get the youngers to make
one. It can be painted any colour/s and decorated with any embellishments -
gears, cogs, butterflies, fairies, unicorns, easter bunny, vintage, the options are
limitless. The yong ones can even add an elastic and wear it when its done 😁
It could even be made and decorated for halloween👻
I have added a print out below in case you don't have the dies to cut the oval shapes
you need. I didn't, so I used the large and medium ovals on the print out as templates.
I printed them on an A4 sheet.
To make my hat I die cut some embellishments. I did not have an embossing folder
to create the texture on the hat so I used Joint reinforcing tape that is self adhesive and
creates a great texture. You can cut it to any shape and size for any project.
Here are the products I used.
I adhered the joint tape and painted the hat with black gesso.
I then used #dovecraft 3D pearl effects to colour the die cuts to create colour with
shimmer. I used the Nuvo vintage drops as well to colour some of the embellishments.
I used the 3D Pearl effects and Vintage drops to add "drops" on the hat.
I forgot to add photos of the process 😑 I got so involved in making it, I forgot 😏
I used the #imaginationcrafts liquid gilt and a dry brush technique to highlight the
joinery tape texture. I also used it to highlight the embelishments and flowers for
a shine.
But please check out the tutorial, if you have problems viewing it and I will add a
version you can print. Let me know
Here are a few more photos:
Thank you for stopping by.
Pop in again for the next Hat I make - Steampunk feature.
I used this PVA glue I bought on Amazon.co.uk and works like a bomb
I painted a square thick card with black Gesso ( you can use any dark acryllic paint - make sure
it dries fully).
I then covered the square with the PVA glue - not too thick - but the measurements are
provided in the tutorial link above. Just before it fully dries (transparent and sticky)
I painted over it with a lighter acryllic paint.
If you use a light paint underneath use a darker top coat - this emphasises the cracks.
*note: I found the outside dried quicker than the centre so try and ensure you paint the PVA
thicker on the outside than the centre.
This is the amazing effect when it dries completely.
Soooo, stay tuned as I have decided to use this technique as a backround on a journal
page - ooh la la.
Give it a go. I think this could work on furniture to give that great cracked effect and
then seal it with a good sealer.
There are so many ideas that come to mind that this technique could be applied to :)
I hope you are all well and safe and using your time at home to craft, craft, craft😁
Just a big thank you to all our Frontline staff in the UK which inlude the NHS, bus drivers,
prison officials, waste collectors and all the guys and gals that put so much work into ensuring our shops are stocked and to so many hidden gems we forget are out there making sure the country
is still going and keeping us safe.
Today I am sharing a tutorial I found to make a book box and how I decorated my creation.
This was so much fun and anyone can do it, great to get the youngers involved to create
and keep their photos and keepsakes of the fun at home 😜
#infusions
#paperartsy
#13arts
#13@rts
#colorglow
#modpodge
#13@rts
#gesso
#decoartmedia
#crackleglaze
I have taken a photo of the products I used for reference and wow they are awesome.
First I am going to share the video tutorial with you to make the book box (and I am sure many
of you have cartons at home from all the home deliveries :))
Then I will share my steps with you on how I decorated it and then lastly I entered this
into two competitions as I was inspired by both and these details will be listed at the end.
Video Tutorial
Process:
I created the Book box using the method in the tutorial above but I wanted to try
something different with the "cover" of the book.
I used white airdry clay to create the peeling of the edges and the few lumps
on the cover. I took some clay and rolled it flat and as thin as possible, then lay it
on the cover (used Mod Podge to glue it in place, you can use gel medium or glue).
I cut the clay into a square and lay it from the corner to the fit the edge of the cover,
I then rolled it over to creat the lifted corner.
I used a little water and my finger to smooth the inside of the square to
blend it as smooth as possible into the cover. I added a few more folded corners and
rippled edges. I left it to dry for a few hours - in the meantime.
I printed the "Bird" picture on tissue paper - I cut a piece of tissue paper a little
smaller than an A4 page. I used tape to stick it to the A4 printing paper and printed
the image on my inkjet printer. I printed the picture the size of the cover. I wanted
the image to curl under the curled edges as well.
I left it for a few minutes to ensure the ink was dry.
I then used Mod Podge matte to adhere the tissue paper to the cover. This allows the
background texture to come through and make it vintage.
I used Infusions and 13arts Color Glow to mix the colour of the outside and inside of
the book box. I tried to match it as close as possible to the Greenish blue of the cover.
I mixed the Dye powders with 13@rts White gesso.
I used these two Color Glows with water to create the colour to stain the "pages".
I used brown acryllic paint to paint the undercover where the cover had "lifted"
I then added DecoArt Crackle glaze by the areas where the cover has curled up.
I left this to dry.
I stamped my quote on Tissue paper and heat dried, I used mod podge to adhere to the
inside of the book cover.
Once the crackle glaze was dry, I used Black gesso mixed with a little water and
painted this over the crackle to fill the cracks, I then used a wet wipe away the
excess paint.
Here are a few close ups:
A few extra:
I have entered my project into two challenges - click on the image to be taken to the challenge:
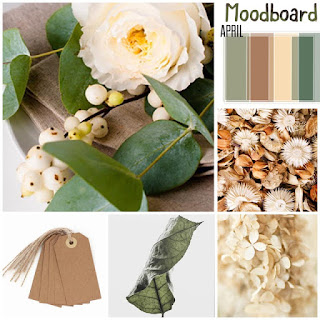
"I invite you to join me to the moodboard challange of april 🥰 i was inspired by the walk in the nature. It was a day with not much of a sunlight, but there is already spring awakening outside, which already gives warm tones and a bit of green shade of nature."
-Andra
I loved the colours of this mood board and found it inspiring - Nature and natural and I
wanted to make something vintage.
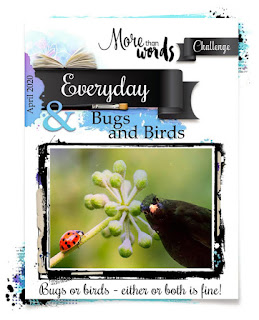
Word Inspiration - EVERYDAY
Creative Challenge - BUGS AND BIRDS
Nature is very soothing and healing, and this month
we are encouraging you to immerse yourself in it!
This challenge crossed over the 13@rts challenge and I had an image with a bird that
I wanted to use but I did not know when or how and this challenge inspired me to use
the image on the cover of my book box and also try different techniques (tissue paper,
print on tissue paper, decoupage and Mod podge - I usually use gel medium).
My quote I used was a stamp that I love - it pretty much says everything positive and to enjoy
life. I added "Everyday" because you should practice this everyday.
Thank you for joining me today and I hope you feel inspired to create something of your own.
It has been a while since I posted on my blog, but as usual time flies, but....
now being at home, I have been busy busy busy crafting.
I hope you are keeping well and practicing social distancing so we stay healthy at
this time. I hope you are enjoying the time at home, for those that can, and taking
advantage of creating inspiring projects.
Today and many days hereafter, I will be posting the projects that I have created, and
oh so many :)
I am sharing a Journal page with you today that I created and was inspired by the
"Mixed Media Place" moodboard Challenge. Please click on the image below for the details
and please join in the fun.
Here are some of the products I used for the journal page:
#13arts
#pigments
#mixedmediainkspray
#imaginationcrafts
I used a christmas serviette with silver baubles on to create the background and texture
I used clear Gesso to stick this down on the journal page. On a closer look, you can see
the wonderful texture it created.
I then used Pebeo Modelling paste through a stencil to add more texture.
I used the Mixed Media ink sprays to add colour to the pages and added a little spritz
of water to allow it to run or make the colour abit lighter.
I then found the picture I wanted to use and pulled out some of my embellishments and
printed words.
I wanted to work out the layout and where I wanted the embellishments.
Once I was happy with this, I used the Mixed Media Ink Sprays to colour the Gesso
painted die cuts and chipboard embellishments.
I decided to add #Ranger White Distress Dabber paint to the embellishments as I
wanted them abit lighter.
I liked the water weathered effect it gave.
I then put it all together and glued down the Embellishments and photo, and added
a few flowers. I did leave some of the die cuts white as I liked the effect of them standing out.
I added white glitter to the page with Gel medium and some Black splatter as well.
I decided to add the resin wing to finish off the project - I think this added the finishing touch.
I added some bronze wax with my finger to some of the embellishments for a little highlite.
unfortunately you cannot really see it in the photos.
But here are a few more for you...
I hope you enjoyed this post and please visit soon as I have been so busy crafting - I have so
much to share.
Thank you as always for popping over - it always means alot.
Please take care and all the best to you and your family.