Monday, May 30, 2016

Glue Gun Circle Frame

TUTORIAL


I created the vintage, string like circle frames with my Glue gun and glue sticks.


You will need Glue sticks, your Glue gun, Cardstock (preferably white) and a sheet of acetate.


I drew a circle template on a piece of cardboard and put acetate over


I then traced the circle with the glue gun - on top of the Acetate
MAKE sure you dont make your lines too THIN, because
when you need to lift the glue rings from the acetate, it will break.
Try make nice thick lines.


Once you have completed tracing your first circle with your glue,
Move the acetate sheet slightly over to create an overlapping circle.
Once you are happy with the position, trace the new circle with your glue.


When you are done you can move the acetate sheet again and trace another overlapping circle.
You can make as many circles as you like, keeping the centre as
the frame for the picture.

REMEMBER - You can make OVAL, Half moon and square shapes,
Even STARS - single or overlapping shapes.


Once you are done and the glue is dry, you are ready to lift your creative piece off the acetate.


I usually use a blade to lift up a section, thereafter once you have a good grip, you can peel it off the sheet.

Just go SLOW

Don't worry of it breaks somewhere on the circle, you just heat up your Glue gun and stick it back together :)


I have made two circle frames
I then paint with Gesso, to make sure my dye sprays and /or
inks will stick to the resin.

My acryllic paints and distress paints seem to stick to the glue resin
without gesso.


Here are my two frames painted
The one I used Distress paint dabber - Picked Rasberry
On the other - I painted it with Gesso, Once dry, i then sprayed it with Yellow shimmer Dye Spray on one half, and on the other half, I inked it with Ranger Patena - Victorian Gold.


A few more pics to check out:


Hope you enjoyed - I really hope you try it out. If you do leave me some love in the comments and
let me know how it went, please post me some pics. Please feel free to share it on my facebook page:

https://www.facebook.com/ScrapSenSations-316313541751236


Happy Scrapping
Candace

Friday, May 20, 2016

Special Moments

Special moments are ..........


The rare occasions when I am actually in front of the camera
and not the one taking all the pics. I love love taking the photos and my fave ones
are when no one is aware of it - so natural.

So it is not often I have a photo of Hubby and I together.
It is a Special Moment and a Special memory, as it was taken at my Dad-in-laws'
60th Birthday Bash.


The "string circles" I used as a frame were circles I made using my glue gun and Glue sticks
I wanted something different and decided to try it. Check out the little mini tutorial below - I hope you try it out, you can make any shape and size. 

I used the Spellbinders "Sprightly Sprockets" die set and cut out the gears 'n cogs on grey cardstock
I then sprayed them with Prima Bloom - Tea Stain for a little shimmer.
I used a few of the gears to create a stencil and inked around them to give the shadow effect on the layout.
I used the Kaizercraft Quarter stencil (Chevrons) and used white Distress Paint Dapper over the Stenciled Gears (Top right , Bottom left)

I cut out chevrons from scrap paper, used clock stamps, flowers, pearls and doilies to embellish the layout

I have entered this layout for the following challenges: 


The colours, elements and embellishments used were inspired by the following challenges

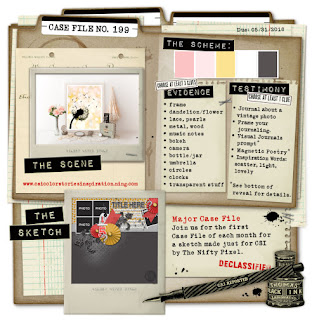
CSI case 199 - 

 CSI - Case 199

CSI - Colour, Stories, Inspiration - Case File 199
I enjoyed using the scheme. I used 
several of the Evidence: Frame, Flowers, Pearls, 
Metal, Circles, Clocks and the Testimony.

MTW May Major challenge with the MOMENT and Clocks. 

 MTW May 2016 Challenge
 This is a Very special Moment, as photos of hubby and i are few and far between.
I love taking photos of hubby and my two boys together and everything they get up to.
Time goes by so quickly that we need to record these moments.


.The sketch from Scrap Africa #74 is what I used as the Layout.

 ScrapAfrica Challenge #74
I love clocks and gears - especially having boys in my life. The chevron was something 
new to me to use, and i really enjoyed making them and placing them. 


TUTORIAL 


I created the vintage, string like circle frames with my Glue gun and glue sticks.


You will need Glue sticks, your Glue gun, Cardstock (preferably white) and a sheet of acetate.


I drew a circle template on a piece of cardboard and put acetate over


I then traced the circle with the glue gun - on top of the Acetate
MAKE sure you dont make your lines too THIN, because
when you need to lift the glue rings from the acetate, it will break.
Try make nice thick lines.


Once you have completed tracing your first circle with your glue,
Move the acetate sheet slightly over to create an overlapping circle.
Once you are happy with the position, trace the new circle with your glue.


When you are done you can move the acetate sheet again and trace another overlapping circle.
You can make as many circles as you like, keeping the centre as
the frame for the picture.

REMEMBER - You can make OVAL, Half moon and square shapes, 
Even STARTS - single or overlapping shapes.


Once you are done and the glue is dry, you are ready to lift your creative piece off the acetate.

I usually use a blade to lift up a section, thereafter once you have a good grip, you can peel it off the sheet.

Just go SLOW

Don't worry of it breaks somewhere on the circle, you just heat up your Glue gun and stick it back together :)


I have made two circle frames
I then paint with Gesso, to make sure my dye sprays and /or
inks will stick to the resin.

My acryllic paints and distress paints seem to stick to the glue resin
without gesso.


Here are my two frames painted
The one I used Distress paint dabber - Picked Rasberry
On the other - I painted it with Gesso, Once dry, i then sprayed it with Yellow shimmer Dye Spray on one half, and on the other half, I inked it with Ranger Patena - Victorian Gold.


A few more pics to check out:


Hope you enjoyed - I really hope you try it out. If you do leave me some love in the comments and
let me know how it went, please post me some pics. Please feel free to share it on my facebook page:

https://www.facebook.com/ScrapSenSations-316313541751236


Happy Scrapping
Candace

Sunday, May 15, 2016

Boy meets Girl - Moments of Life

Good day all

Hope you are all having an awesome day
Here in SA Gauteng, it has been raining non stop but today we have a few rays of sun peeping through the clouds, so..... I love weather like that, it means time for SCRAPPING and Scrapping
and more Scrapping.

Below is my latest project - Single layout:


The Anticipation, the Excitement and the joy in our Nieces' face, when she meets her new baby cousin. These are the fleeting moments that go so quickly, we forget how we feel and how they feel,  and then they are BIG. These little MOMENTS are the precious ones that fade as time goes by: 

There are a few challenges I have entered this layout into and will list them below.


I was inspired by the challenges: CSI case 199 - I am not usually one to use pinks
but I really enjoyed doing this and this challenge is at the time that our nephew has
just arrived into this world. I enjoyed incorporating the MTW May Major challenge with the MOMENT and Clocks. The sketch from Scrap Africa #74 is what I used as the idea for the Layout.

The picture was taken by the new Mommy when my Niece was introduced to
her new baby Cousin (our Nephew). So between pinks, clocks and gears, it was a perfect match.

Challenges I entered: 

 CSI - Case 199

CSI - Colour, Stories, Inspiration - Case File 199
The Scheme was an exciting challenge as I don't use pink 
often but with such a beautiful Niece - enjoyed. I used 
several of the Evidence: Frame, Flowers, Lace, Pearls, 
Metal, Bottle, Circles, Clocks and the Testimony.
 MTW May 2016 Challenge
 My Layout includes the word MOMENT on a sign, as this
is a very special event. After much anticipation and watching 
Aunty's tummy grow over Time, she couldn't wait to meet Peanut.

 ScrapAfrica Challenge #74

I liked the sketch challenge from Scrap Africa #74, especially
with the round frame and the gears and cogs - Ideal to 
include for my new Nephew. 

I hope you enjoyed visiting my blog - please pop over again. The links to the above challenges 
are linked to the image, so please pop over the blogs and give it a try, even if it is to check out the 
awe inspiring work from the Design teams and the entrees from all over the world.. 


Sweet blessings for the week ahead. 
Candace 


Tuesday, May 10, 2016

Journal Page - Roses & butterflies

Butterflies and Roses


Just playing around with my Kaizer craft Stamp and Die sets:

These are so Awesome - Stamp and then Die cut your image
I still have my first Emboss/Die cut machine - the original Cuttlebug.
Still works like a bomb and it cuts all the Dies - if they are the tealights
then  I use the embossing mat.


Used dye sprays on the background - Yellow Shimmer and Pink
I stamped and die cut the Roses, Leaves and Butterflies. 
I Die cut three Roses in Light Pink and Yellow (two in cerise )

The two dark pink roses I stuck down flat and then worked around these two.
The third roses I etsy cut - centre out and them stuck the centre on one rose with foam dots
and the outside bit on the other rose with foam dots. 

I used Liquid Pearls on the roses - Bisque on the yellow roses and Lavender lace on the 
Pink roses. I outlined the Petals and accentuated the centre and dark lines.

I used two little stamps and placed them randomly under the butterflies 

The butterflies were die cut on patterned paper - Pink and Blue
I then dabbed the wings with matching Acrylic Dabber paints and then sprayed them 
with Prima Color bloom - Tea Stain. I love the Shimmery effect this spray has.


Thank you for joining me today and hope you will be trying it out and 
having some fun. 

Happy Scrappy
Candace 

Sunday, May 8, 2016

Happy Mothers Day - SA

Happy Mothers day to my very special Mum


Spent time with my Mom this morning - Hubby and Boys made us breakfast and boy was it
Deli-Licious.

I made a special canvas as a gift for my Mom - Mixed media
She loves her Grandchildren to bits - they are her everything :)


I stuck some chippies down on the canvas with some flowers, ribbon, lace and crinkled masking tape, which I placed to create the Zip effect. I also stenciled some Texture paste.

I painted it all with Gesso (two coats). Once dried I used my Dye sprays (blue black, Yellow Shimmer, Caramel). I then inked all my embellishments with Gold - Ranger Patina Victorian Gold.
I used Prima Pearls by the Zip and placed all my elements where I wanted them and adhered them all down.
My favourite adhesive is the Bostik Glue GEL - I just love it. No Drip, Dries quick, No warping. Its the only glue I use.

I wish I could get the picture to do the canvas justice.

To all the Marvelous Moms out there - Happy mothers day and hope you got spoils
of Love.

Have an awesome scrap booking week !!

Candace

Monday, May 2, 2016

Celebrations - Decade displayed with Gold

Afternoon all

Hope you all had a wonderful weekend. It is a public holiday here in SA
So of course another opportunity to Scrap, Scrap, Scrap.......

A Decade of Celebrations 


https://www.facebook.com/TheWholesaler/?fref=photo


One of our suppliers: The Wholesaler.Biz is celebrating their 10 year Birthday and
the theme is all that Is GOLD and of course glitters


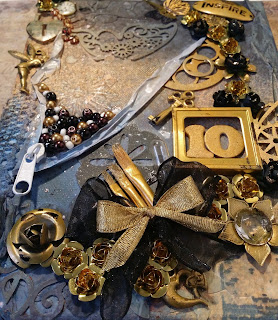
I created a canvas working with the Gold theme. I stuck down a few chippies, masking tape, lace and embellishments.
I then painted over all these elements and the whole Canvas with Gesso.

I used Dye ink spray (some home made, some bought) - Yellow shimmer, Black, Dark Brown and Caramel.

Once Dry I splattered some white acryllic paint.

I accentuated the wrinkled masking tape with White acrylic Dabber and added a white zip element.
I gathered all the embellishments I wanted to use and those that were not Gold I then dapped with
Ranger Patina - Victorian Gold.

I arranged the elements and stuck them all down. I added some mini black roses and used gold Glitzen Glamour to highlit the edges of the leaves.

I finished off a splatter her and there of Black Soot Acrylic Dabber.


Hope you guys enjoy.

Wishing you lots of inspiration and scrapping

God Bless
Candace