Monday, December 14, 2015

Christmas Freebie...


Christmas Tags


SVG cut file : https://app.sugarsync.com/iris/wf/D3170279_06321563_66549


Christmas Tree


Check back for more Christmas cut file freebies this week 

Have a lovely day further 

Chow for now :)

Little Angels 


Happy Monday all ....

New week means... New layouts to scrap, new tutorials to try out
and new ideas to try.

This is a SHARE today ..

I found this tutorial on PINTEREST and just thought this is such an awesome idea,
especially with Christmas just around the corner.

You can do so much with these little angels and so easy to make, add to layouts,
cards, mixed media, serviette holders etc.

Please check out the website as there are many tutorials to try...
https://featheredfibers.wordpress.com


Angel Bead Tutorial

Here is an easy tutorial for bead lovers, including new beaders.   I made all three bead angels in less than 10 minutes.  You can find all the supplies at ArtBeads.com:
Supplies:
Bead Caps in either silver, copper or bronze;
Angel wings in either silver, copper or brass
6 mm Spacer bead in silver, copper or brass for halo
4mm and 6 mm Swarovski Crystal bicone for head and inside the cone, or;
Variety of 4-6 mm pearls to use for head or at the bottom inside the cone;
Tools:
———————————————————————–
Instructions:  Let’s begin!  Lay out all your supplies and decide what metals you wish to combine for your angel.  Once you have laid them out, simply place them on the sterling silver head pin in this order:
This illustration also shows you the order of what goes where:
Once you have done this, your next decision has to do with whether you want a long wire or a short one to dangle it from your necklace (or pin, bookmark, etc).  Notice the varying lengths of wire in this photo:
What you plan to do with the angel dictates how long or short you have your wire.
On this bead angel,  I have left the wire long since I haven’t yet decided what I will do with it.  This is a good tip if you are making them as presents.
In bead angel 2, shown below,  I have cut the wire shorter.  This angel, I plan to dangle off of a metal bookmark.  I do have a free Bookmark Tutorial if you want to make your own.
 This angel would look great combined with one of my metal bookmarks:
Additionally, you can buy a pre-made bookmark, too, from ArtBeads.com or at your local bead store.
Next picture, notice that Bead Angel 3 has the shortest wire showing of all three angels:
Instead, I used the round nose pliers to make a built-in “eye” or loop ring to attach to the silver curved tube bead ring, shown just above the angel.  If you do not know how to do this, please watch and follow this video on making loops with wire.  Now, to finish this gift, all I have to do is add a necklace and I am done.
I made a necklace for Ramona, my DMIL as a gift.  She called and told me that all her friends at her church loved it.  This necklace makes a wonderful, one-of-a-kind gift for friends and family.
————————————–
Remember, you can substitute any supplies you have on hand already.  Here is a lovely angel made by Kathy Jasper.  She made this after I posted my illustration above the other day.  Notice how by using different materials, you get a unique look:
If you enjoy and use this tutorial, please drop me a comment or message like Kathy did.   Thanks to Kathy for sharing her angel, btw!
I have a large number of free tutorials besides this one.  My tutorials cover a wide variety of arts and crafts, too.  I have a Tutorial button at the top of this page just above my Blog Header illustration if you wish to visit.  In the meantime, enjoy the Holiday Season!!  Hugs, Carla

Tuesday, December 8, 2015

Hi All

Hope you are all having a fantastic week, tomorrow we will be half way through.
Here in SA we are feeling the heat, with one of the hottest heat waves yet, but do not fear...
no matter what happens, we will always have scrapping...

Here is another Journal page I have made. Following on from the previous one, same idea but I used dye spray inks on the background (gesso'd pages) and more stamps and i made tags with quotes.

Added some flowers as well.

I really like this one. Hope you do as well.

Feel inspired and create


Thursday, December 3, 2015

Love Journal pages....

It's a way to experiment,  see what textures work and what techniques can be mixed and matched.

This is the 4th page in my art journal.
Now I can take what I have learnt (and what I shouldn't do) and apply to my mixed media projects and layouts.

Hope you like:
I used old pages from a novel and painted with gesso - not too much so the text comes through. The round bubbles - i dtew circles and filled them with dimendion glase- please wait until it is completely dry. It is not a thick layer but enough for the effect. I then dripped Adirondack alcohol is down the page. I then added blending solution and tilted the page up and down for the effect. 
I stamped a background with black ink. 
Remember when you are finished you can use a wet wipe and wipe your bubbles- any ink on there will come off and keep it clear with white background. You can use any background colour. It is so effective.
I then used a stencil with texture paste. You can colour an amount of the texture paste you will use with Adirondack ink or acrylic paint. 

Instead of using a stencil and texture paste. You could stamp images or stamp sayings on tags and stick it down over artwork. 

So many ideas....

Have fun....

Friday, November 13, 2015

Mixed Media


I just love this specific type of creative craft. There are so many talented people out
there sharing their techniques. So.... don't be afraid, get out there and try it. It is so
much fun and there is never a mistake. Whatever you do just adds to the dimensions
and layers.

Hope you have fun making your Mixed Media Projects - Big or small

Here is one of my latest projects. I finished it a while ago but just been abit busy to
post

Wood frame with canvas blocks inside, added alot of embellishments and some extra
goodies I found lying around.


Beautiful Babies

For all the Mommies, new and old and for those Mom's to be -congratulations on your miracles

Here is a layout I did. Of course it's about a Boy. I have two, and just loving it. I will make a little lady layout so stay tuned.

I was inspired by Hillcrest Art Supplies.


Have a Fantastic Friday


Monday, November 2, 2015

Dont worry - I'll still be posting all my new carfts and techniques
and any thing new I learn in the UK :)

I am selling a stunning Hobby/Work station cupboard
It can be used as your Hobby/ Craft Workplace, a Sowing cabinet where you 
can store everything you need, or even a Study that closes and looks like a cabinet.
Very versatile, it has wheels for easy movement. 
The table folds out for you to work on, plenty storage place for all your craft items or 
stationery and Machines.
The inside of the Right door has shelves, and the inside of the left door has a peg 
board and Velcro.
If you are interested, send me a message or email me on candacedeo@gmail.com
R3500


SO .... our Journey begins

We have decided to immigrate to the UK and with that
We are selling all our belongings except....... my Scrap goodies

but there is one item I am selling:

Cricut Expression Machine

It comes with the Manuals, CD, Power cord, USB connector cord to PC
and 4 Cartridges: Accent Essentials, Plantin schoolbook, Story book, Home Accents
and an Extra cutting blade.

Selling Price R1500-00


email me on candacedeo@gmail if you are interested

Monday, June 29, 2015

Soooo Whats up with this JOURNAL ??


So lately I see there is quite a charm about Journals.
You decorate them and then use the Journals to write in or Scrapbook in or
... really anything.

So I decided I am going to start one. And I have decided to use it to practice my
Mixed media techniques in it.

I haven't covered it yet but I have tried a project or two.
Here is one I saw and decided I had to try it.
So instead of doing it on canvas first, I decided to do it in my journal

And Waaala.....

Now I know what I am doing and what I can't do, so next step is doing this on a nice big Canvas
to put up in our home and share :)


Happy Scrappying
Candace

Its a New Week, its a New Time...

Its more time for Scrapping :)

I have been quite busy trying out the Box Album and I have made another  ...(OMG)....

Below is a few pics to show you, I hope this will inspire you to try and make one.
It is so much fun. There is so much inspiration on Pinterest as well, it helps to create album covers and the fillers for inside ( and just love the Tags)

Take a Peak ....


I used products that i have purchased here in SA - Gauteng.

I used papers and inks from Scrapbook-Direct and papers from Fabscraps. I use inks from Scrapbook-direct. I use Enmarc Dye sprays and any all embelishments and flowers i can find.
I use my home made Texture paste (I found the recipe on Pinterest)

Friday, June 12, 2015

Album Book Box 

Just love this technique - it is so versatile. So many options, colours and ideas
You can put photos in, Gift cards, Little gifts....

This one I Made for my Mum... I included photos of her siblings.
Special memories, as all of them live overseas now.

Hope you enjoy and find inspiration....


Front and Back


Latch and Hinges (sides)


 Inside


Check out the previous Book Box for the tutorial
Happy Scrapping

Wednesday, May 13, 2015

Jewelry box - Mini Album Book Box


I decided to alter the idea of the Mini Album book box and made a Jewelry box.

I used a lid of a box I had lying around and used foam core to create the compartments.
I covered the box and the foam core and stuck it all together.

I tried a new idea for the spine of the Album - eyelets and weaving - I used white twine.
I am definitely going to make another one. I had so much fun and there are so many ideas
to decorate and new techniques to try.

Hope you enjoy:

Front of the box

Top of the box

Sides of the box

Inside of the box - top cover lifted
You can put in a special poem or quote or even a photo frame with a special photo.

 back of the box 

Hope you have a Wonderful Wednesday :)

SVG'S


Assorted and free

https://www.dropbox.com/sh/ayu4gn6hmiv3kyg/AABWUXB2i0Wrd5XtKvBkMfAAa?dl=0

Check out the SVG's per the link above.
Hope you can use these for your cards and scrapbooking Layouts/projects

Have fun

Monday, May 11, 2015

MOTHERS DAY SHARE.....

Mothers Day - I had such a wonderful Mothers day Yesterday. My Hubby and my Boys Spoilt me. I spent most of the day with my Mommy and my Brother and Sister inlaw and my Nephew. It was Super Fantastic.
Made a Printers Tray gift of Memorable Moments for my Mom
 — 

This is the Gift i mentioned earlier - but I couldn't post it yet. 


I did make an additional Gift - Book Box Album. As soon as i have uploaded the Photos i will share with you. Hope you all had a Wonderful Mothers day - May you blessed with a Fantastic Week.

Friday, May 8, 2015

Book Box

Celebrating Mothers day 

Always a special day and so every day we should celebrate our Moms.

I have been very busy with my mothers day gift, but shshshhsh, I can only share after 
Mothers day. Surprise gift for my special Mom. 

But... in between this project i tried out the Book Box, i found an awesome tutorial by 

My inspiration came from here. Such wonderful talent and so creative.


In my project, I used Lids from two gift boxes. Initially I covered it in paper and 
then decided to paint the outside. As you go along you will choose and change to suit your 
style.


You can use Tins (same size), lids of tins, boxes etc.
I measured the inside of my box lids and cut paper to measure - stuck it all down.
You can use double sided tape or glue (your favourite one)

I love the Bostik Gel glue. It dries clear and quickly. Its thick so it doesnt run like the normal Bostik
glue. It also seems to stick anything. Awesome stuff. I keep boxes of it.


This was my FIRST attempt so bear with me. 

For the Album covers (outside covers) I used cardboard from a box as I ran out of my thick chipboard. You can also use foam core or covers of your old and used black hard cover books. 

Due to the rough edges on the cardboard (from a box) I didn't
want to use a lot of ink or paint to try and finish the edges nicely
It is corrugated so it ain't easy.

Soooo... what i did was use Washi tape and put it around the
border of the album covers.

I then used patterned paper to cover the outside and the inside of the Album covers.
You can use your scrap paper as well - I'm sure you have plentch stashed away - I do :)

I then used stencils and Texture paste, as well as Dye ink sprays and acrylic paint dabbers. and of course Stamps to decorate the outside of the Album covers

The tutorial from artfully musing explains how to put the boxes together and put on your big hinge
or two smaller hinges ( love Hubby's tool boxes - always stuff in there for me to use) and the latch.

This Book Box can be used for Fathers day as well as a Gift box for Gift cards.
You can fill them with special photos or Momentoes. If you lie the Book box flat you can even
add compartments and give as a jewelry box with a stunning photo on the inside lid.  


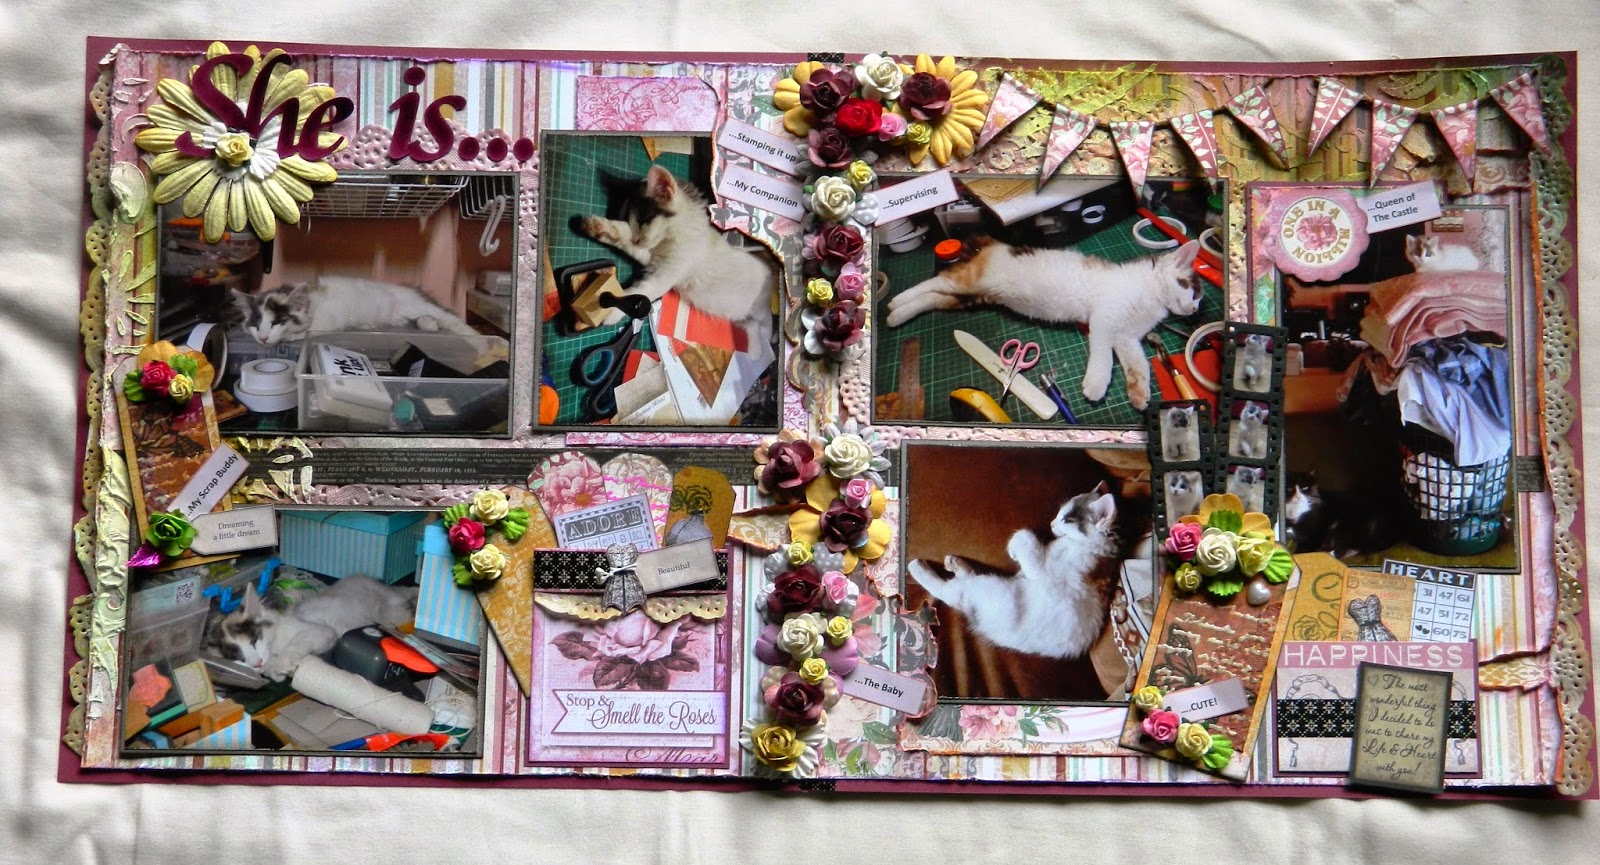
 Here is my project below. I hope you enjoy and find inspirational today


My Fury Feline also had to check the project out, so you can see his whiskers on the above pic.


I will share my Mothers day gift with you next week. But check out the blog above and have fun. 

Happy Mothers day to you all, may you be blessed with love and family this weekend.


Monday, March 23, 2015

SHE IS .........


... a character.

Our new edition to the family has a mind of her own. What a personality.

Wanted to share this with you: I sued Gesso for texture in the background, Dye sprays,
flowers, hnd made tags and printed tags.

Hope you enjoy.

Wishing you all a wonderful week ahead

Happy Crafting

https://www.facebook.com/pages/ScrapSenSations
https://www.facebook.com/groups/440123526156735/?pnref=lhc

Wednesday, March 11, 2015

Baby Album

I am sharing with you my new double lay out i have just completed for my eldest sons Baby Album
This is all about his baptism.
As you will notice - no shoes. He wasn't fan.
This was shared with family and we had family over from Portugal too.

Tuesday, March 3, 2015

INVITATIONS - Order yours now

Contact ScrapSenSations and place your order - Contact us for details and price. 

Exploding Box Invitations: 

40th Birthday 


Sweet 16 !


Wedding 


Wedding - Vintage - Shabby Shic


Contact ScrapSenSations for your Party or Wedding Requirements. 

Let us Create, design, and personalize your Wedding and Party invitations, thank you cards etc.

enquiries@scrapsensations.co.za

Happy Scrapping 
Candace