Happy Monday all ....
New week means... New layouts to scrap, new tutorials to try out
and new ideas to try.
This is a SHARE today ..
I found this tutorial on PINTEREST and just thought this is such an awesome idea,
especially with Christmas just around the corner.
You can do so much with these little angels and so easy to make, add to layouts,
cards, mixed media, serviette holders etc.
Please check out the website as there are many tutorials to try...
Here is an easy tutorial for bead lovers, including new beaders.
I made all three bead angels in less than 10 minutes. You can find all the supplies at ArtBeads.com:
Supplies:
Bead Caps in either silver, copper or bronze;
Tools:
———————————————————————–
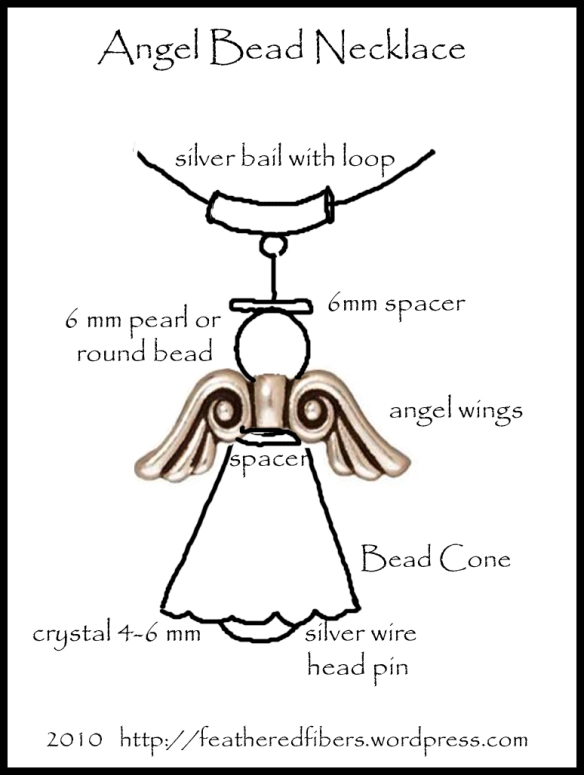
Instructions: Let’s begin! Lay out all your supplies and decide what metals you wish to combine for your angel. Once you have laid them out, simply place them on the sterling silver head pin in this order:
This illustration also shows you the order of what goes where:
Once you have done this, your next decision has to do with whether you want a long wire or a short one to dangle it from your necklace (or pin, bookmark, etc). Notice the varying lengths of wire in this photo:
What you plan to do with the angel dictates how long or short you have your wire.
On this bead angel, I have left the wire long since I haven’t yet decided what I will do with it. This is a good tip if you are making them as presents.
In bead angel 2, shown below, I have cut the wire shorter. This angel, I plan to dangle off of a metal bookmark. I do have a
free Bookmark Tutorial if you want to make your own.

This angel would look great combined with one of my metal bookmarks:
Additionally, you can buy a
pre-made bookmark, too, from
ArtBeads.com or at your local bead store.
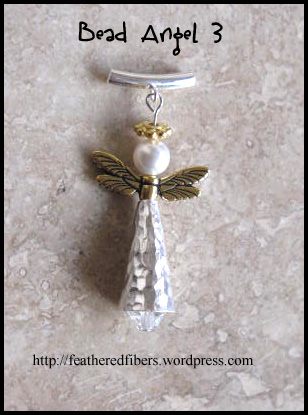
Next picture, notice that Bead Angel 3 has the shortest wire showing of all three angels:
Instead, I used the round nose pliers to make a built-in “eye” or loop ring to attach to the silver curved tube bead ring, shown just above the angel. If you do not know how to do this, please watch and follow
this video on making loops with wire. Now, to finish this gift, all I have to do is add a necklace and I am done.
I made a necklace for Ramona, my DMIL as a gift. She called and told me that all her friends at her church loved it. This necklace makes a wonderful, one-of-a-kind gift for friends and family.
————————————–
Remember, you can substitute any supplies you have on hand already. Here is a lovely angel made by Kathy Jasper. She made this after I posted my illustration above the other day. Notice how by using different materials, you get a unique look:
If you enjoy and use this tutorial, please drop me a comment or message like Kathy did. Thanks to Kathy for sharing her angel, btw!
I have a large number of free tutorials besides this one. My tutorials cover a wide variety of arts and crafts, too. I have a Tutorial button at the top of this page just above my Blog Header illustration if you wish to visit. In the meantime, enjoy the Holiday Season!! Hugs, Carla


